How to Convert Any Website to Android App in Android Studio?

In this article , we will learn how to Convert Any Website to Android App in Android Studio. follow the steps below  to Convert Any Website to Android App in Android Studio

Step 1: Create a New Project in Android Studio

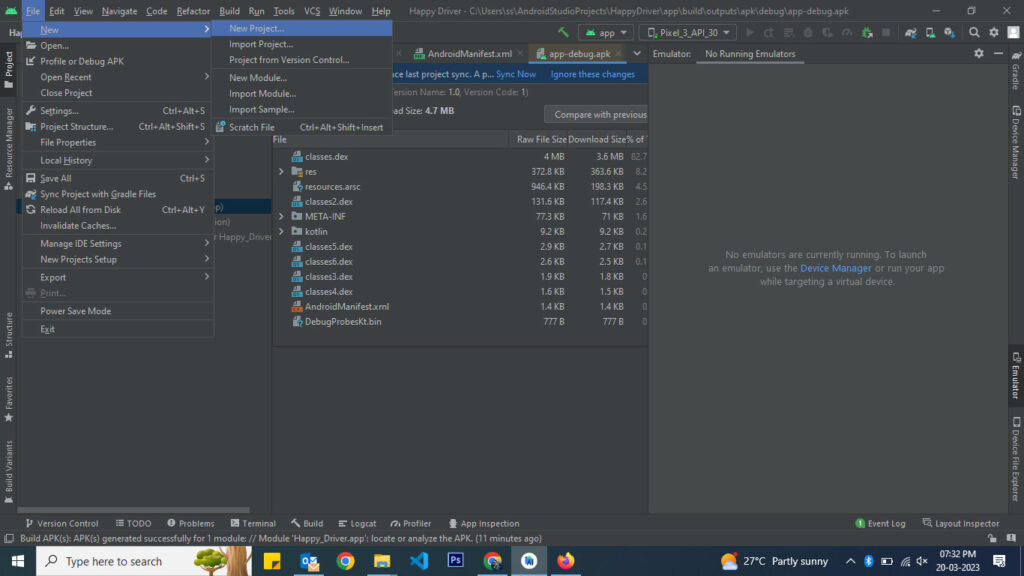
To create a new project in  Android Studio click on  File > New > New Project as show in the image below

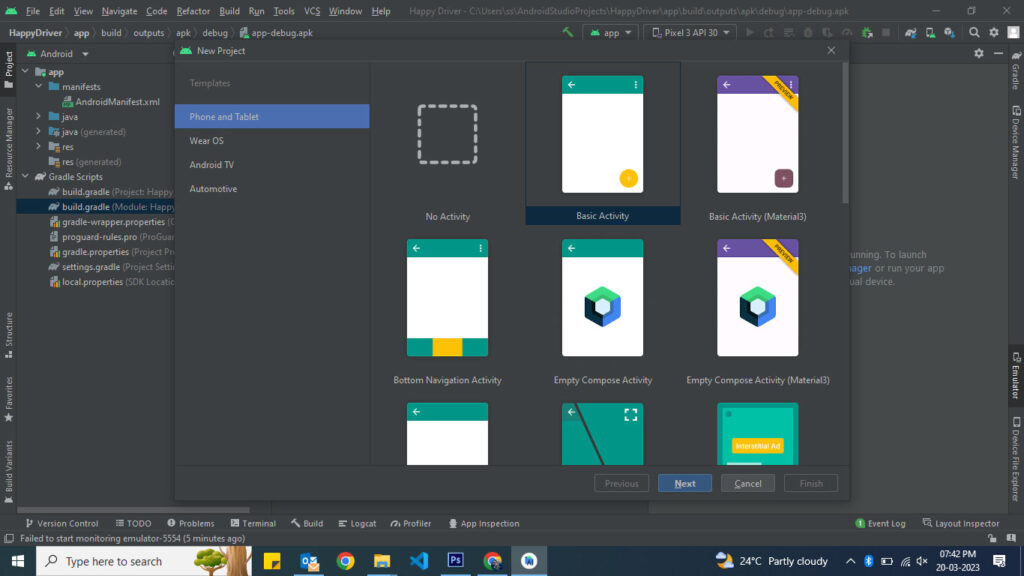
click on Phone & Tablet and select Basic Activity template and click next as shown in the image below

Now enter Project Name,Package name, and set Project Location at last  Select Language as Java and click finish

Our new project has been created and ready to use in android studio

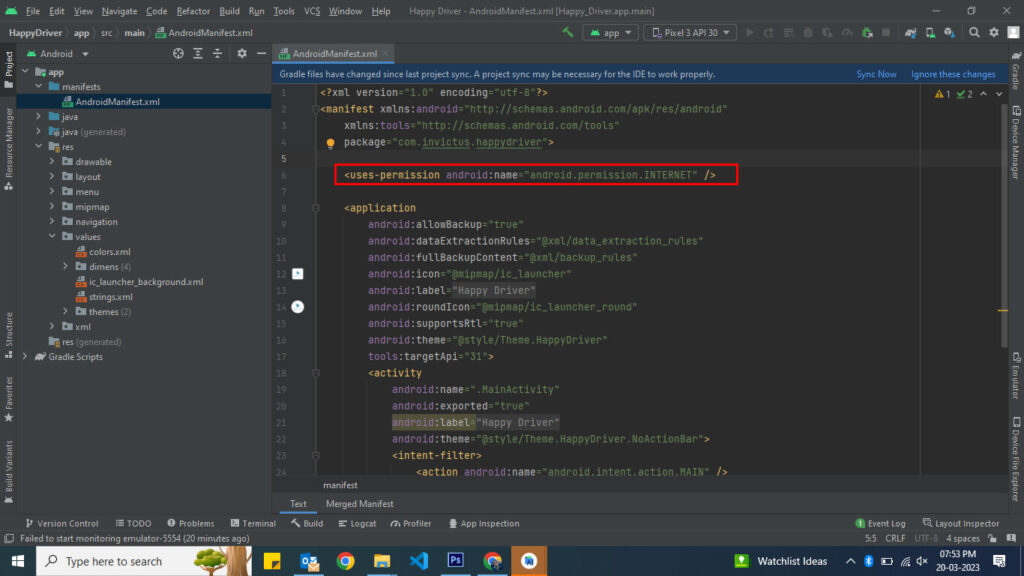
Now open  manifest >  AndroidManifest.xml file and add one line of code highlighted in image below

We have added this code to take permission to access  the internet so that our WebView can work easily.

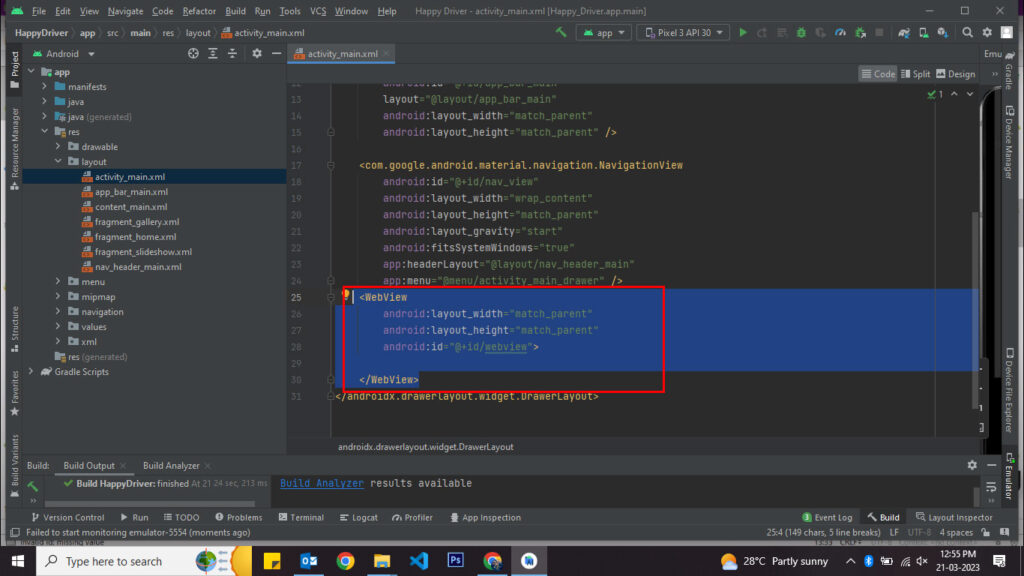
Now open res > layout >activity_main.xml file and add the code as highlighted in the image below

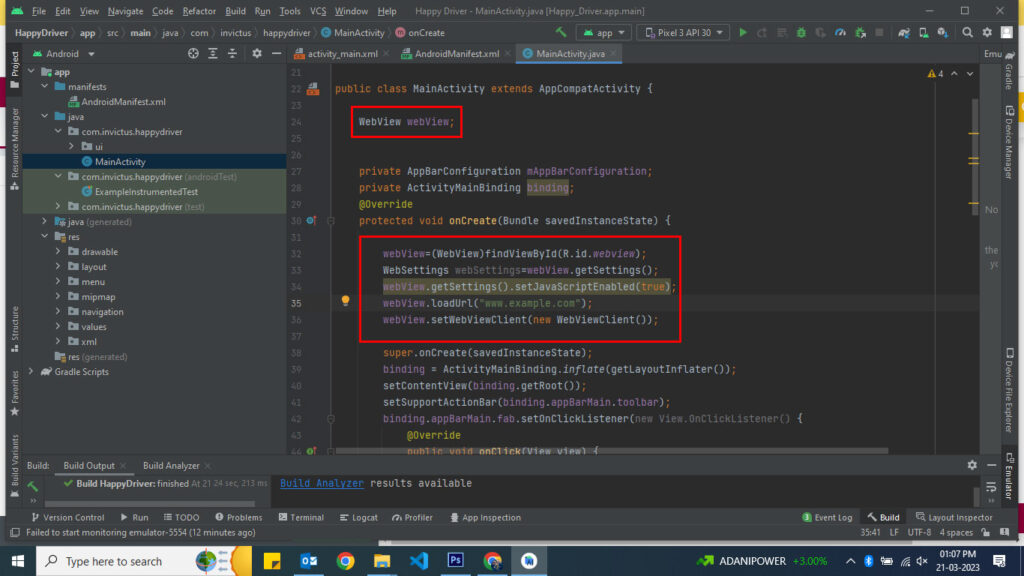
After that go to  java > your_apps_package_name folder  > MainActivity.java file and add below code in MainActivity class as shown in image

WebView webView;


webView=(WebView)findViewById(R.id.webview);
WebSettings webSettings=webView.getSettings();
webView.getSettings().setJavaScriptEnabled(true);
webView.loadUrl("https://www.example.com");
webView.setWebViewClient(new WebViewClient());

Note: Do not forget to add your website url instead of www.example.com

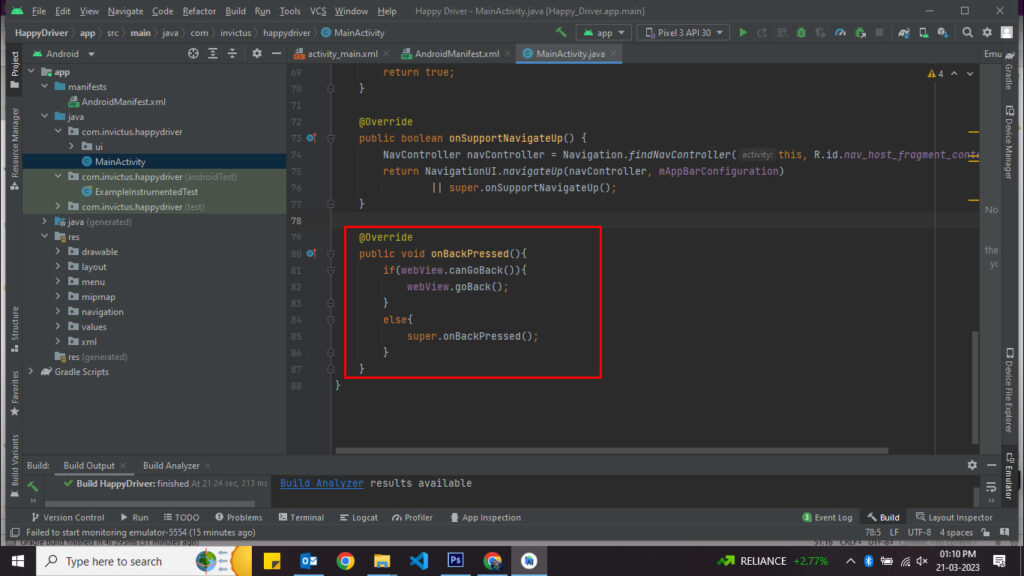
Finally add below code  at ending of  MainActivity class as shown in the image

That’s all Now build your application and your apk will be ready to use 

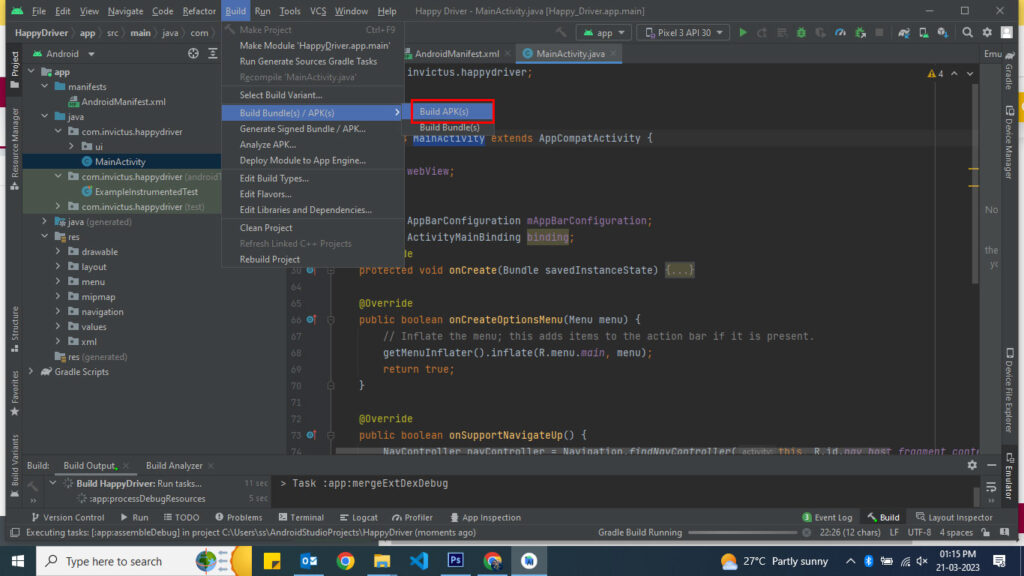
To build the apk click on Build >  Build bundle(s) /Apk(s) > Build Apk(s) as shown in image below

Hurray..!! Your apk is generated install it on virtual or physical device to check is everything is working fine.

It is the end of the article we have learned How to Convert Any Website to Android App in Android Studio.

How to add Splash Screen to your Ionic Capacitor App

In this article we will learn how to create a splash screen for an Ionic capacitor application and how to add it to our ionic App.

so let’s get started!

First of all, we’ll need Ionic CLI which will be required to create our ionic application. So, if you haven’t installed it on your desktop, than open your terminal and type

npm install -g @ionic/cli

This will install ionic CLI on your system 

Create ionic application

Navigate to the folder where you want to to create your project, and type the following command

ionic start myFirstApp sidemenu --type=ionic-angular --capacitor

This will create an ionic application with sidemenu

Install the @capacitor/splash-screen plugin

Installing the @capacitor/splash-screen plugin is the next step. So, navigate to the “myFirstApp ” folder, and type the following command

npm install @capacitor/splash-screen

Add Android Platform

Let’s now add the Android platform using the commands below.

ionic cap add android
ionic cap sync

This will add the android platform to our ionic capacitor project

create Icon and Splash Screen for our ionic app

Create icon and splash screen images using any image editor which you like

The size for icon should be 1024px X 1024px and for splash screen 2732px X 2732px.

Install the cordova-res plugin

Run the following commands this will crop and resize JPEG and PNG source images to generate icons and splash screens for our ionic app

npm install cordova-res --save-dev
cordova-res android --skip-config --copy

after running these commands you will see “resources/android” folder created in your application, where we will find our icons and splash screens, in all formats needed by Android.

Let’s examine the outcome of our efforts!

We require a real device that is  connected via USB to our PC. This is essential because an emulator might not display the Icon and Splash Screen appropriately.

Enter the following commands in the terminal after connecting your device with an USB cable. When prompted, choose your device.

ionic capacitor sync android
ionic capacitor run android -l-r

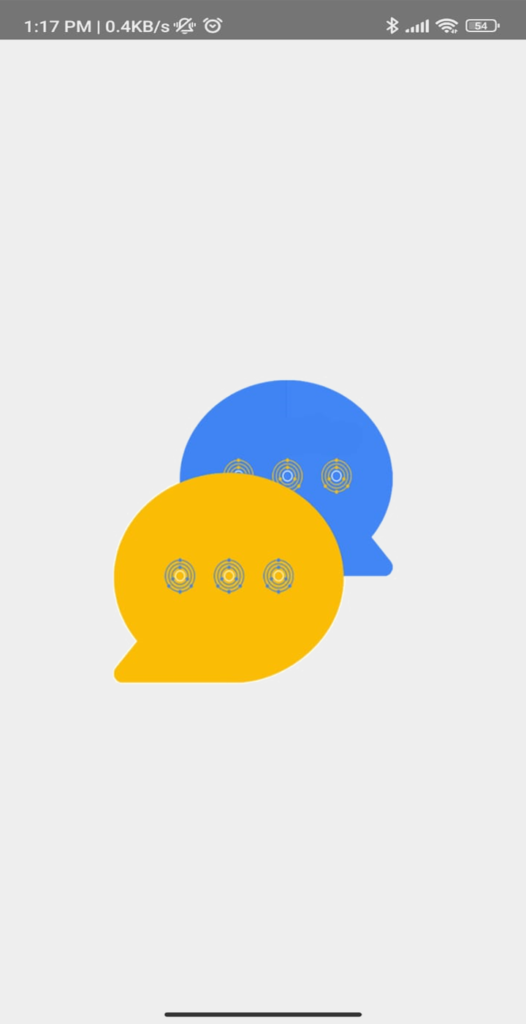
As you can see, our app’s icon and splash screen has been properly incorporated.
Sometimes splash screen may appear stretched but thanks to the @capacitor/splash-screen plugin that we have installed, we can easily control some properties of the Splash Screen of our App.

We can set a background color or the time it will remain visible. And we can also tell capacitor how we want it to position and size our image within the Splash Screen of our App.

Open the capacitor.config.json file, and paste the following code


{
"appId": "com.invictus.mysfirstapp",
"appName": "MyFirstApp",
"webDir": "www",
"bundledWebRuntime": false,
"plugins": {
"SplashScreen": {
"launchShowDuration": 5000,
"launchAutoHide": true,
"androidScaleType": "CENTER_CROP",
"splashImmersive": true,
"backgroundColor": "#ffffff"
        }
     }
}

Here we’re telling Capacitor that we want
1. the Splash Screen displayed for 5 seconds
2. Splash Screen will auto-hide (after 5 seconds)
3. image will be cropped to the center of the screen
4 and we want our Splash Screen has a White (#ffffff) background

After that the following code needs to be changed in the “android/app/src/main/res/values/styles.xml” file

<style name=“AppTheme.NoActionBarLaunch” parent=“AppTheme.NoActionBar”>
<item name=“android:background”>@drawable/splash</item>
</style>

Replace with

<style name=“AppTheme.NoActionBarLaunch” parent=“AppTheme.NoActionBar”>
<item name=“android:background”>@drawable/splash</item><item name=“android:windowIsTranslucent”>true</item>
</style>

Hurray..!! we did it.

By executing the following commands, we can now relaunch our app and everything will be fine.

ionic capacitor sync android
ionic capacitor run android -l-r

I hope you find this article to be helpful.

Please feel free to email me at shoeb@invictuswebsolutions.com if you have any questions or recommendations.

Call Now
7972334779

WhatsApp
7972334779